0

Recent Posts widget for Blogger

If you have regular visitors, they are more interested in your recent updates since their last visit. By providing a list of recent posts, you are making their stay at your blog pleasant. Blogger do not have a standard widget for you to include easily into your blog.

Don’t worry. There is a small work-around that would help you to install the recent posts widget on to your blog. The trick is to use the “Feed” page element provided by Blogger. You just have to get a feed from your own blog. If it’s still fuzzy to you, the following step-by-step should make things clear.
  1. Log in to your Blogger account
  2. On the dashboard, click on the “Settings” link
  3. Blogger Dashboard
  4. On the Settings tab, click on the “Site Feed” tab
  5. Site Feed Tab
  6. Check the field "Allow Blog Feed". Please select either "Full" or "Short" in the drop-down menu. You have to ensure that "None"” is not selected
  7. Click "Save Settings" button at the bottom of the page
  8. Save Settings Button
  9. Now, click on the "Template" tab. This will take you to the “Page Elements” tab
  10. Template Tab
  11. Click on the "Add a Page Element" link at the section where you want to include the list of recent posts. You can include it in the sidebar or just below the post
  12. Add Page Element Link
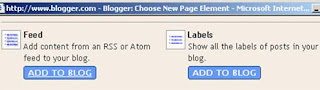
  13. In the Page Elements pop-up window, scroll down to find the page element "Feed"
  14. Add Feed Element Button
  15. Click the "Add to Blog" button
  16. Type the feed URL of your own blog. In the example below, I have typed my feedburner feed for my blog. You can also use the Blogger’s default feed URL http://yourblogname.blogspot.com/feeds/post/default. Replace the yourblogname accordingly for your blog.
  17. Feed URL
  18. Click on "Continue"
  19. In the window that pops up, you can configure your feed. Type in a suitable name for your page element, like Recent Posts or Latest Posts
  20. Configure Feed
  21. Select the number of posts to be displayed. Blogger allows only a maximum of 5 items to be displayed
  22. You can choose to display the date of posting and the author name if you want. You will see a preview of your feed in the box
  23. Click on "Save Changes"


0

Related Posts Widget for Blogger

I have discussed before about the importance of providing various navigational aids for your reader, like a list of recent posts or a list of categories. A list of related posts is another important feature that should be implemented in each and every blog.

The longer you keep the visitors on your blog, the better. When a visitor reads a post on a particular category, it is natural to assume that he will probably be interested in other posts under the same category. This will improve the page visits and the length of the time a visitor spends on your blog.

I have discussed about the importance of tags in one of my previous posts
Why should I tag my posts?
In addition to the benefits discussed, tags help to extract a list of related posts for your current post. I have tried a few widgets for related posts available for free on the net. I have listed them below. Feel free to explore further on the respective sites:

1.
Hoctro’s Place: This seems to be the starting point for others, who came out with few modifications. Even though there are some enhancements from others, which I have discussed below, I still like Hoctro’s version. It requires the code to be copied to just one location. It comes in handy as a widget. You just need to modify the default URL to your blog’s URL. If you like to set the maximum number of posts to be displayed, then there is an option to change this.

2.
Jackbook.com: This is a slightly modified version from Hoctro’s. The advantage here is you need not modify the code to point to your blog. The process is already automated. Jackbook also overcomes one drawback in Hoctro’s version, which displays the current article also under the related posts. Another change is that the related posts will be displayed only on the item page and not on the home page. In Hoctro’s version, you could choose to do both. If you are not familiar with HTML, then I would recommend Jackbook’s version, as it is very simple to install.

3.
Purplemoggy: This is a bit difficult compared to the above two, as it requires the code to be copied/ modified at a few places. I tried once, but it didn’t work for me. I am not sure why it is so. But, you can try to see if this works for you.

0

Recent Comments Widget for Blogger

Earlier, I have written a post on how to install the Recent Posts widget for Blogger. In this post, you will see how to install the recent comments widget for Blogger. I have to accept that I am not a great fan of the recent comments widget. While I certainly favoured the installation of the recent posts widget to enhance the blog's navigation, I leave it to you to decide whether you need a widget for recent comments. I personally feel that it is not very useful unless you have lots of visitors who contribute regularly.

Blogger do not have a standard widget for you to include easily into your blog. But, don’t worry. There is a small work-around that would help you to install the recent comments widget on to your blog. The trick is to use the “Feed” page element provided by Blogger. You just have to get a feed from your own blog. Just follow the step-by-step tutorial below that should make things clear.

  1. Log in to your Blogger account
  2. On the dashboard, click on the “Settings” link
  3. On the Settings tab, click on the “Site Feed” tab
  4. Check the field “Allow Blog Feed”. Please select either “Full” or “Short” in the drop-down menu. You have to ensure that “None” is not selected
  5. Click “Save Settings” button at the bottom of the page
  6. Now, click on the “Template” tab. This will take you to the “Page Elements” tab
  7. Click on the “Add a Page Element” link at the section where you want to include the list of recent comments. You can include it in the sidebar or just below the post
  8. In the Page Elements pop-up window, scroll down to find the page element “Feed”
  9. Click the “Add to Blog” button
  10. Type the comments feed URL of your own blog, which should look like http://yourblogname.blogspot.com/feeds/comments/default/. Replace the text "yourblogname" accordingly for your blog.
  11. Click on “Continue”
  12. In the window that pops up, you can configure your feed. Type in a suitable title for your page element, like Recent Comments or Latest Comments
  13. Select the number of comments to be displayed. Blogger allows only a maximum of 5 items to be displayed
  14. You can choose to display the date of the comment and the author name if you want. You will see a preview of your feed in the box
  15. Click on “Save Changes”

0

Poll Widget for Blogger

There are several ways to interact with your readers. The comments section for each post is one way for your readers to interact with you. If you need to find your readers' response on a particular issue, then you could use a poll.

For example, you want to find out whether your readers like your template. Then, you can include a poll on your blog with a question "How would you rate my template?". You might want to give your readers choices like "Very Good, Good, Average, Poor, Very Poor". You will get some useful information for you to take a decision.

Blogger has a standard Poll widget included as a Page element. It is quite easy and intuitive to install this widget. I won't call this a Blogger Hack. This post is mainly intended for new bloggers coming on to the Blogger platform. If you are already familiar with installing page elements, you may not find anything useful. You could go on to read my posts on
related posts widget, recent posts widget or recent comments widget.

  1. Log in to your Blogger account.
  2. Click on the “Layout” link just below your blog name. This will take you to the “Page Elements” tab.
  3. Layout Link
  4. Click on the “Add a Page Element” link at the section where you want to include the poll question. You can include it in the sidebar or just below the post.
  5. In the Page Elements pop-up window, you will find the page element “Poll” on top of the window.
  6. Click the “Add to Blog” button. This will open the "Create a Poll" window for you.
  7. Poll Question
  8. Type in the question for your readers. Add the choices, one of which your readers will choose as answer. You could add more options by clicking on "Add another answer" or remove some options by clicking on "remove".
  9. By default, your reader can choose only one answer. If you want to allow your reader to choose multiple answers, then click the check box "Allow visitors to select multiple answers"
  10. You could set the closing date of the poll; the default is one week.
  11. Click on “Save”

0

Popular Posts Widget for Blogger

In this post, I am going to share with you how to install the popular posts widget for Blogger. This widget will display a list of your popular articles, ranked by the number of views. Please read my earlier posts on Blogger hacks to know how to install the Recent posts widget, Recent comments widget, Poll widget and Related posts widget.

Current status
List of popular posts is, by far, the most difficult widget to implement and I had seen very little work on this area for Blogger/ Blogspot. Earlier, I have used a version from AffiliateBrand, which I will discuss in another post. Now, I am going to recommend another version from Spotplex, which I found more powerful.

How to install the tracking code?
The following steps will guide you through the simple installation procedure
  1. Please click here to go to Spotplex home page.
  2. Once the home page is opened, please click on the rectangle near the top-right corner of the page with the title “Get your Spotplex code”
    PopularPosts_1
  3. Step 1: Register your blog
    • Type your blog address
    • Click on the button “Get my Spotplex code”
      PopularPosts_2
  4. Step 2: Blog information
    • The title will automatically be retrieved. If you want to change it, then do so.
    • Write a simple description for your blog
    • Select the categories, maximum of 3
    • Select your blog’s language
    • Type in your e-mail address
    • Check on the “I agree to the terms …”
    • Click on the “Submit” button
      PopularPosts_3
  5. Step 3: Get your Spotplex code
    • This is basically the credit to Spotplex. Choose whether you want to display an image or no image
    • Then, select the blogging platform. If your blog is on Blogger, then choose Blogger
    • Click the button “Install Spotplex Widget”
    • This will open the login page for Blogger. Login with your account and install the Spotplex widget.
      PopularPosts_4
You have just completed the installation of the tracking code that will track the page views on your blog. The next part is to install the Popular posts widget. Install the tracking code as explained above, otherwise the popular posts widget will not work.

How to install the Popular Posts Widget?
  1. Click on the link “Get widget” just below the header
    PopularPosts_5
  2. Scope: Choose “Specific blog” to display the popular articles of your own blog
  3. Type: Type your blog url or the Spotplex code in the text box and then select “Popular Articles”
  4. Options:
    • Choose the period for refreshing the popular articles. If you select “24 hours”, it will display your popular articles over the last 24 hours. If you select “All time”, it will display your all time popular posts
    • Choose the width and height based on your sidebar dimensions
    • Choose how many posts to display, 5, 10 or 15
    • Click on “Get this widget”
      PopularPosts_6
  5. This will display the HTML code for the widget. Copy the code to clipboard.
    PopularPosts_7
  6. Login to your Blogger account
  7. On the dashboard, Click on “Layout”
  8. On the Page elements tab, click on “Add a page element”
  9. Under the page element “HTML/Javascript”, click "Add to Blog"
  10. Paste the code from Spotplex and save the page element

That’s it. You have completed the installation. Wait for some time to let Spotplex collect the data. Then, the popular posts widget will start showing your popular articles with the number of views for each post as shown below:
PopularPosts_8

Copyright © 2009 Top Widgets 4 Blogger All rights reserved. Theme by Laptop Geek. | Bloggerized by FalconHive.